Jun 24 - 5min readSwiftUI vs Interface builderBy Launchbase
By far the biggest update in xCode history, this update brings different approaches to almost all fields of development on the platform. The closest addition to it in its’ lifecycle that we could compare to, would probably be bringing Swift to ObjectiveC in 2014.
While both updates where major, the key difference are the approach to building UI. With addition of the Swift, UIKit basically stayed intact. On the other hand, the SwiftUI’s most obvious change is the replacement of the UIKit. Storyboard and xibs were probably the biggest advantages for the longest period of time from Apple. We also noticed other platforms adopting similar approaches over the past few years, but Apple decide to drop them.
SWIFTUI makes a hard break from that past because it’s a Swift-only framework. Not because Apple has decided that it’s time for Objective-C to die, but because it lets SwiftUI leverage the full range of Swift’s functionality (value types, opaque return types, protocol extensions, and more).
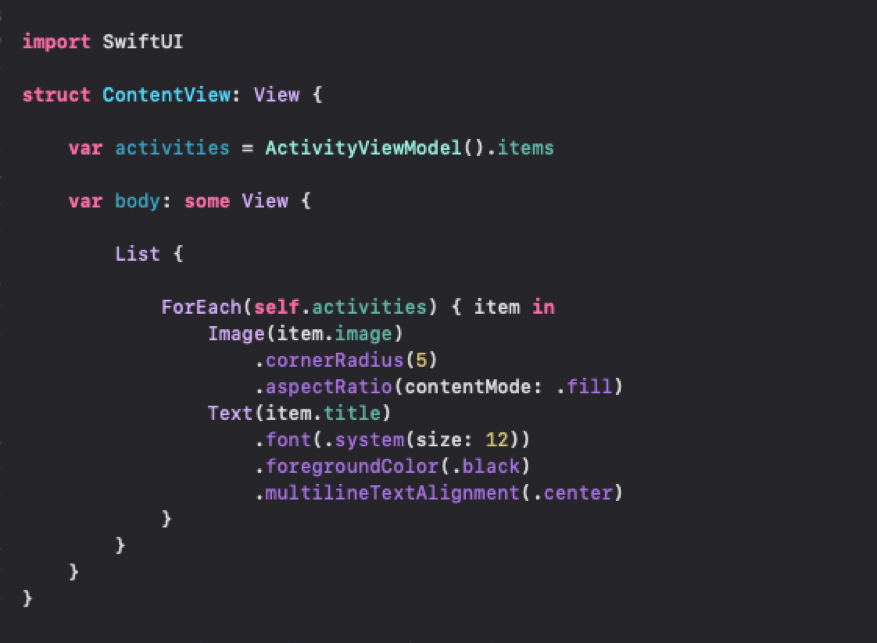
UI works using declarative syntax so that you can simply state what your user interface should do. As an example, we can write that you want in a list form consisting of images and text fields. You can follow this by describing other attributes like shape, aspect, etc. for image and alignment, font and colour for each field.
Drag and drop is still possible and can arrange components within your UI by simply dragging controls on the canvas. Use inspector to select font, color, alignment, etc. and easily re-arrange controls with your cursor. Most of these visual editors are also available within the code editors. It can be used to discover new modifiers for each control, even if you prefer hand-coding parts of your interface. You can also drag controls from your library and drop them on the design canvas or on the code directly.
The Swift compiler and runtime are fully embedded throughout Xcode, so your app is constantly being built and run. The design canvases are not just an approximation of your user interface it is a live app. We can look at Xcode too since it can swap edited code directly in your live app with “dynamic replacement”.
You can preview a SwiftUI side-by-side with its code. a change to one side will update the other side, so they’re always in sync. There aren’t any identifier strings to get wrong. And it’s code, but a lot less than you’d write for UIKit, so it’s easier to understand, edit and debug.

View class is clutter with hundreds of methods and modifiers that gives flexibility on building the framework. However, this is a downside for discoverability. Even with compatibility with the UIKit, that means you can use SwiftUI inside UIKit ViewControllers or the other way around ie. UIViews inside SwiftUI Components. This should allow for easier transitions for developers to SwiftUI as well as projects that are already in progress on the UIKit.
INTERFACE BUILDER revolves around reducing the amount of coding developers do which allows for you to design a full user interface without writing any code. Simply put,
“It is easier to independently design your interfaces separately from their implementations.”
‘Drag and drop’ is the biggest advantage to building a user interface programmatically. You can arrange components within your UI by simply dragging controls onto the canvas. Use inspector to set selected number of attributes like font, colour, alignment, etc, and easily re-arrange controls with your cursor.
_____
“Wait…what?
Just selected number of attributes? Why not all possible attributes?
Don’t worry about it, we’re gonna get back to it soon.”
_____
Storyboard and xib can be seen as visual representations of the application and a way of previewing your current UI progress. They are XML interface builder files. The XML generated is not documented correctly since it is hard to read, no tools to validate it, and it is almost impossible to write by hand. But the clue is in the same, ‘Interface builder’. It is not intended to be hard-coded or re-written or to require from you deeper dive into XML itself. It’s there so you can do UI simply, mostly using just your mouse.
There are things that are not available in inspector. You cannot hard-code them.
So what can you do?
Simply, customise them within the implementation files. “Independently design” does not sound that much independent does it? We can use all this to run away to SwiftUI without even looking again to UIKit, especially if you are beginner. But as always, there is another side to the story. There is a reason why inspector has just selected a number of attributes. If you are interested in xCode, SwiftUI or UIKit, there is a big chance that you are there because of your interest in the app development sector.
So let’s use simple analogy from app development. The more features and customisations an app has, does not mean it is a better product overall. Too many bells and whistles can make the user loose interst in the app even before the user actually experienced core functionality of the product.
First registration screen (email, name, password) – done.
Second (interests, birth day, profile image) – makes sense.
Third screen (gender, phone number, location) – you’ve lost them.
People’s wants from a product are simple – to make their lives easier. The same thing can be said for UI inspector. There are probably just the right amount of things that it needs.
And for the rest, as usual, there are more than a few simple solutions but we just need to dig a bit more. For example we can use simple view, drag and drop it into Storyboard, change background colour and outside of that by the looks of it, there is not much what we can do in inspector. But we want corner radius, borders, shadow.

IBDesignable and IBInspectable are there to allow developers to create interface (or view) that renders in Interface Builder in real time with custom attributes. In general, to apply this new feature, all you need to do is create a visual class by subclassing UIView or UIControl. You can just simply use this to write visual class for view from the previous example and declare all of the features we need. This will be available in inspector to adjust values. You can customise the amount of attributes available in inspector based on the product requirements or even enforce default values so that in most cases, it will preset required values for that additional attributes.

For any problem or “downside” on any of both approaches, if it is SwiftUI or UIKit, there more than a few solutions. Some of them can also be used as an advantage if used the right way in the end. Sure, if you are a beginner, SwiftUI sounds like the obvious choice as new kid on the block. But don’t forget that UIKit is here for the long haul and whatever you need, there are probably a variety of ready-made solutions that are just waiting on you to find them.
In the end it all comes down to personal preference and it may be for the best to simplify things when making the decision.
Visual vs code, experience vs new journey, independent vs dependent